Garena Free Fire is one of the most popular battle royale games in the world, loved by millions for its fast-paced action, character abilities, and competitive gameplay. One of the key skills that separates a beginner from a pro player is aim control—and more specifically.
- Understanding Sensitivity in Free Fire
- What Are “All-Red Headshots”?
- Best Sensitivity Settings for All-Red Headshots
- How to Adjust Sensitivity in Free Fire
- Device-Based Sensitivity Adjustments
- Low-End Devices (2GB–3GB RAM)
- Mid-Range Devices (4GB–6GB RAM)
- High-End Devices (8GB+ RAM, 120Hz Display)
- Techniques to Get All-Red Headshots
- Factors Affecting Sensitivity Performance
- Common Mistakes Players Make with Sensitivity
- Practice Routine for Perfect Headshots
- Additional Settings to Support Better Aim
- Frequently Asked Question
- Conclusion
The ability to land consistent headshots. Players often talk about the term “All-Red Headshots,” which refers to hitting precise headshots that cause the hit marker to appear completely red, signaling maximum damage.
Achieving this level of precision isn’t purely luck—it’s the result of understanding sensitivity settings and fine-tuning them to match your playstyle and device. In this detailed guide, we’ll cover everything you need to know about the best sensitivity settings for Free Fire.
More Read: Free Fire Max Redeem Codes (Oct 1, 2025): Claim Free Rewards
Understanding Sensitivity in Free Fire
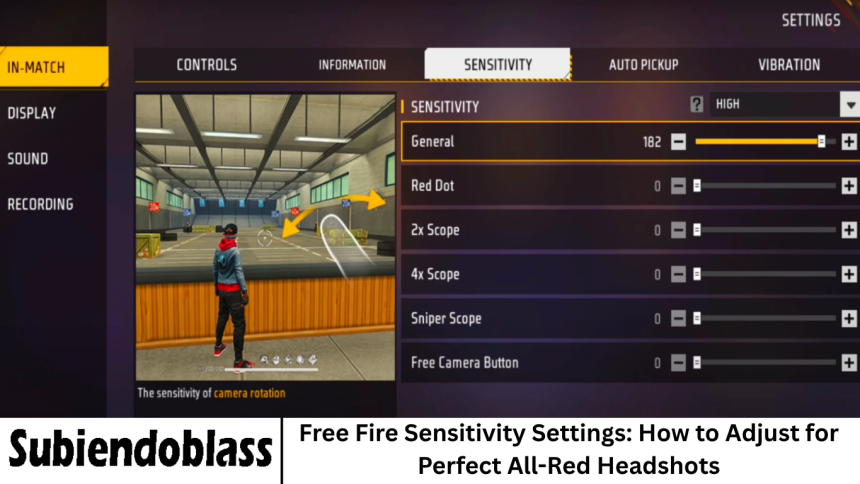
Before we get into numbers, it’s important to understand what “sensitivity” means in Free Fire. Sensitivity settings control how quickly or slowly your camera, scope, and aim respond to your touch or movement. In other words, it determines how much your crosshair moves when you swipe your screen.
There are several sensitivity categories in Free Fire, each responsible for a specific aspect of aiming:
- General Sensitivity: Controls the overall camera movement when you’re not using any scope.
- Red Dot Sensitivity: Affects your aim when using a red dot sight (no zoom).
- 2x Scope Sensitivity: For mid-range combat when using a 2x scope.
- 4x Scope Sensitivity: Used for longer mid-range engagements.
- AWM Scope Sensitivity: Specifically for snipers like the AWM.
- Free Look Sensitivity: Adjusts how quickly you can look around while running or scanning the area.
By customizing these settings properly, you can find the sweet spot between precision and agility—making it easier to hit headshots and control recoil.
What Are “All-Red Headshots”?
In Free Fire, when you shoot an enemy, the hit marker (the indicator that appears on hit) changes color based on the part of the body you hit:
- White: Body shot
- Yellow: Armor or shield hit
- Red: Headshot or critical hit
An “All-Red Headshot” means every bullet you fire connects directly with the opponent’s head, maximizing damage and often resulting in an instant kill. Mastering all-red headshots means your aim and recoil control are nearly perfect.
However, hitting consistent red headshots isn’t just about reaction time—it heavily depends on sensitivity settings, crosshair placement, and movement techniques.
Best Sensitivity Settings for All-Red Headshots
Here’s a tested sensitivity configuration that many pro players and experienced gamers use to consistently achieve red headshots. Note that these settings work best on smooth devices (60–120 FPS). You can tweak them slightly depending on your screen size and comfort.
Setting Recommended Sensitivity
General: 95–100
Red Dot: 90–95
2x Scope: 85–90
4x Scope : 80–85
AWM Scope: 50–55
Free Look: 75–80
Why These: Values Work
- General (95–100): A high general sensitivity allows faster screen movement, making it easier to lock on to enemies and drag your aim upward for headshots.
- Red Dot (90–95): Keeps aim stable while still fast enough to adjust during close combat.
- 2x/4x Scopes: Medium sensitivity ensures precision at longer ranges without over-aiming.
- AWM Scope (50–55): Lower sensitivity ensures fine control when sniping.
- Free Look (75–80): Gives better control while scanning your surroundings.
Pro Tip:
Always test your settings in training mode before applying them in ranked matches. Each device and screen size reacts differently, so small adjustments can make a big difference.
How to Adjust Sensitivity in Free Fire
If you’re new to changing sensitivity settings, here’s a simple step-by-step process:
- Open Free Fire on your device.
- Tap the Settings (gear icon) in the top-right corner of the home screen.
- Go to the “Sensitivity” tab.
- You’ll see the sliders for different scopes and camera options.
- Adjust each slider to your preferred level (based on the table above).
- Once done, save your settings and test them in training mode or casual matches.
Experiment with gradual changes—move sliders by increments of 5 until you find what feels right. Jumping from 50 to 100 suddenly can make your aim uncontrollable.
Device-Based Sensitivity Adjustments
Every device behaves differently due to variations in screen size, resolution, and touch response. Below is a general guide for different device types:
Low-End Devices (2GB–3GB RAM)
- General: 85
- Red Dot: 80
- 2x Scope: 75
- 4x Scope: 70
- AWM Scope: 45
- Free Look: 65
Lower sensitivities help maintain stability and reduce jitter caused by lag.
Mid-Range Devices (4GB–6GB RAM)
- General: 95
- Red Dot: 90
- 2x Scope: 85
- 4x Scope: 80
- AWM Scope: 50
- Free Look: 75
Balanced settings ideal for both stability and speed.
High-End Devices (8GB+ RAM, 120Hz Display)
- General: 100
- Red Dot: 95
- 2x Scope: 90
- 4x Scope: 85
- AWM Scope: 55
- Free Look: 80
Higher sensitivities pair well with smoother frame rates, allowing lightning-fast reactions.
Techniques to Get All-Red Headshots
Having the right sensitivity settings is only half the battle. You also need to practice specific aiming and movement techniques to make your shots count.
Drag Shot Technique
The drag shot is the most common method for getting red headshots in Free Fire.
- Aim at the enemy’s chest.
- Swipe your aim upward quickly right after shooting.
- The bullet trajectory will shift from the body to the head, resulting in a red hit marker.
Crouch and Shoot
Crouching reduces recoil and increases accuracy. Use this technique during mid-range fights:
- Approach an enemy.
- Crouch right before shooting.
- Fire and slightly drag your aim upward.
This helps maintain stability while improving the chance of a headshot.
Jump Shot
For close-range encounters:
- Jump to make yourself a harder target.
- While in mid-air, drag your crosshair toward the enemy’s head.
- Time your shot perfectly for an instant red hit.
Crosshair Placement
Always keep your crosshair at head level when moving around. This minimizes the time required to aim upwards when encountering enemies.
Recoil Control
Automatic weapons like the MP40, M1014, or SCAR can have significant recoil. To counter it:
- Fire in short bursts instead of holding the trigger.
- Use slight downward drags after each shot to stabilize aim.
Factors Affecting Sensitivity Performance
While sensitivity is crucial, several other factors can affect how well you perform:
Device Performance
Lag or frame drops can cause inconsistent aim response. Closing background apps and maintaining device temperature helps keep gameplay smooth.
DPI (Dots Per Inch) Settings
Some advanced players increase their DPI settings through device settings to enhance screen responsiveness. However, be cautious—too high a DPI can make your aim unstable.
Screen Size
Larger screens give better drag control since you have more surface area to swipe. If you’re using a smaller phone, try using thumb sleeves for smoother control.
Control Layout
Custom HUD layout impacts how efficiently you move and aim. Pro players often use a 3-finger or 4-finger claw setup to improve reaction time and shot precision.
Common Mistakes Players Make with Sensitivity
Copying Pro Settings Blindly:
Each player has a different device and playstyle. What works for Raistar might not suit you.
Overly High Sensitivity:
High settings can cause shaky aim if your fingers aren’t used to fast movements.
Not Practicing Enough:
You need consistent practice to adapt to new sensitivity levels.
Ignoring Device Lag:
Even perfect settings can fail if your device lags mid-fight.
Frequent Changes:
Constantly tweaking sensitivity prevents muscle memory from developing.
Practice Routine for Perfect Headshots
Here’s a 15-minute daily training routine to help you master your settings:
Training Ground (5 minutes)
- Warm up with close-range drag shots using SMGs.
- Focus on swiping upward to land headshots.
Mid-Range (5 minutes)
- Use ARs like SCAR or XM8.
- Practice aiming for headshots from medium distance.
Long Range (5 minutes)
- Switch to sniper rifles.
- Practice precise headshots using the AWM.
Consistency is key—daily training helps build muscle memory and reaction accuracy.
Additional Settings to Support Better Aim
Aside from sensitivity, a few other settings can improve aiming:
- Graphics: Set to “Smooth” to ensure high FPS.
- High FPS Mode: Turn it ON.
- Aim Precision: Set to “Default” or “Precise on Scope.”
- Controls: Customize HUD for quick access to aim and shoot buttons.
- Auto-Scope: Turn OFF for better manual control.
Frequently Asked Question
What is the best sensitivity for headshots in Free Fire?
The best sensitivity varies by device, but generally, high values work best:
- General: 95–100
- Red Dot: 90–95
- 2x Scope: 85–90
- 4x Scope: 80–85
- AWM Scope: 50–55
Does high sensitivity mean better aim?
Not necessarily. High sensitivity improves screen movement speed but can reduce control if overused. The ideal setting balances speed and stability.
How can I find my perfect sensitivity?
Experiment with different values in training mode. Start with medium sensitivity and gradually increase or decrease until you’re comfortable.
What’s the difference between red and white hit markers?
A red hit marker means a headshot or high-damage hit, while white indicates a body shot. “All-red” means you’re hitting headshots consistently.
Should I use custom DPI settings?
You can, but cautiously. Increasing DPI can make your aim more responsive, but too high can make it unstable. Start small (around 400–500 DPI increase).
How can I practice all-red headshots?
Use the training ground daily, focus on drag shots, and keep your crosshair at head level. Repetition builds muscle memory.
Do pro players use the same sensitivity?
No. Each pro tailors sensitivity based on their device and playstyle. Use pro settings as a reference, not a rule.
Conclusion
Mastering Free Fire sensitivity settings is one of the most effective ways to improve your gameplay and land consistent all-red headshots. While the numbers provided in this guide serve as a solid starting point, remember that perfect settings vary from player to player.
Take the time to test, tweak, and practice until your sensitivity feels natural. Combine it with strong crosshair placement, recoil control, and drag techniques—and soon, you’ll be headshotting enemies before they even realize what hit them.


